Diagrams.TwoD.Path.Metafont has tools to define Diagrams Trails
in the style of Metafont. This is a convenient way to draw smooth
curves through a series of points, with finer control available on
demand. This tutorial does not assume prior experience with Metafont.
It does assume some famialiarity with Diagrams Trails & Paths.
Getting started
Let's start with the most boring possible example:

> import Diagrams.TwoD.Path.Metafont
> z1 = p2 (1,0)
> example = metafont $ origin .--. endpt z1
I don't mean to suggest that you should actually draw such simple
paths this way. Do take note of the new operator .--., which
connects two points, and endpt, which is only needed at the rightmost
point. We'll see a few more members of the family later on.
Metafont does all of it's interesting work on longer series of points. Let's give it a whirl:
> z1 = p2 (0,1)
> z2 = p2 (1,1)
> z3 = p2 (2,1)
> z4 = p2 (0,0)
> z5 = p2 (1,0)
> z6 = p2 (2,0)
> example = metafont $ z4.--.z1.--.z2.--.endpt z6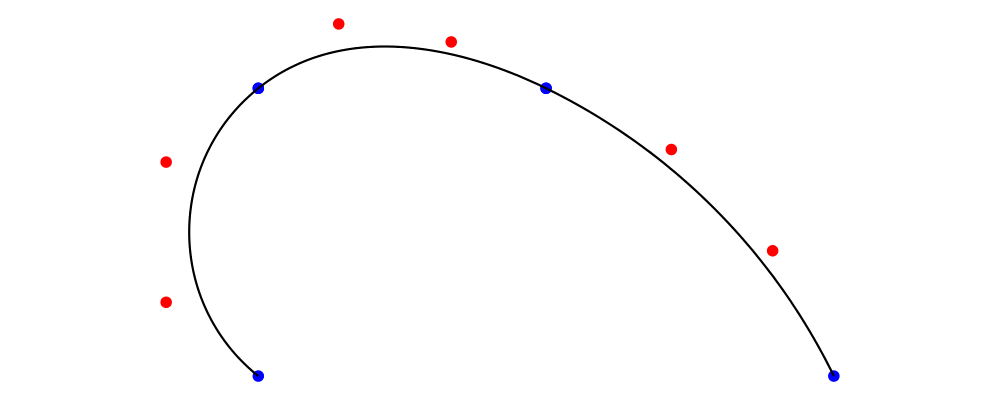
With the code above, we've drawn a Path with three cubic Segments. The endpoints of these segments, marked with blue dots, are the points we specified. The shape of each segment in the middle, described by the red control points, was determined according to Metafont's equations. This is the simplest way to specify paths in Metafont; Metafont does most of the work, and we do as little as possible.
I'll keep using the six points defined above in subsequent examples, but will omit them (and the import statements) from the code samples. I also haven't shown the code that adds the control point dots. If you want to use it for your own tests, see Further Reading.
Specifying Directions
If you make a few curves like this, you'll soon find that the curve Metafont makes isn't the one you had in mind. There are a lot of curves through those points, after all. The real power of the Metafont solver is that we can add more detailed specification to just the segments where we want it.
For example, we can define the direction of the path at any point. Here I ask for the trail to point to the right as it leaves z1. The adjacent paths will curve around to remain smooth and continuous.
> example = metafont $ z4.--.z1 .- leaving unitX -. z2.--.endpt z6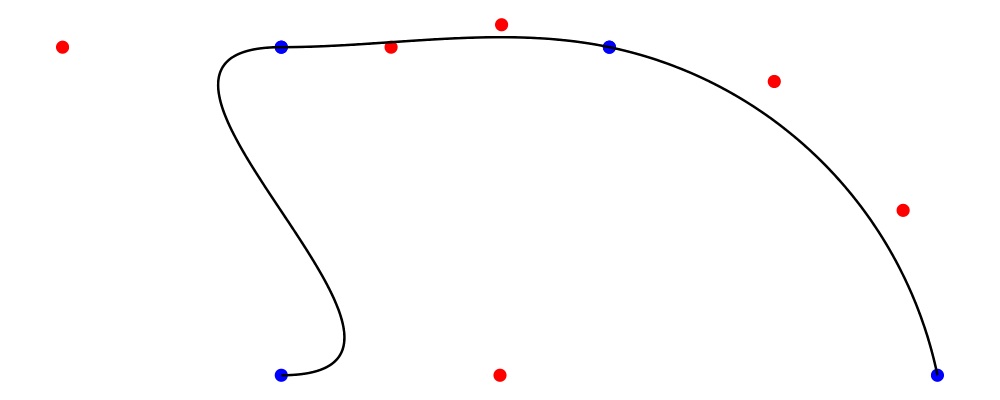
The (.--.) operator is joined by two new operators, (.-) and
(-.). Between them, we write the description of the path connecting
these two points. The complement of leaving is arriving, which
sets the direction of the path as it arrives at the point written to
the right.
Specifying Tensions
Metafont uses another parameter, called tension, in calculating paths. As the tension increases, a segment between two points will become closer to the straight-line path between those points. As the name suggests, you can picture the path as an elastic band, being pulled taut. The tension defaults to 1; here we set it to 1.5.
> example = metafont $ z4 .--. z1.- tension 1.5 -.z2.--.endpt z6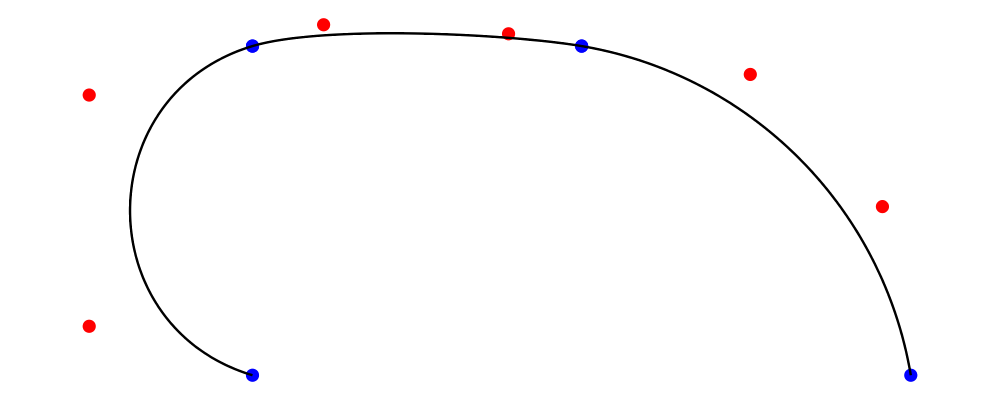
Higher tension corresponds to bezier control points closer to the adjacent endpoint. As a result, the segment has most of its curvature close to the endpoints, and is relatively straight through the middle.
As that description suggests, a segment actually has two tensions, one
at each end. The tension function sets them to the same value. The
tensions function takes two arguments, to set them independently.
Putting it All Together
If you want to specify tensions and a direction, or both directions
for a given segment, joins can be combined using <>. For example:
> example = metafont $ z4 .--. z1.- tension 1.5 <> arriving unitX -.z2.--.endpt z6Explicit Control Points
If you need complete control over a particular segment, you can
specify the control points directly using the function controls.
This function takes two Point V2 Double values, and goes between .- and -.,
just like leaving or tension.
Loops
The Metafont algorithm can also build loops: use cyclePath to
terminate your path instead of endPt p to generate a loop with a
final segment that cycles smoothly back to where the loop started. Of course,
you can exercise control over the final segment in the same way as any
other.
> example = metafont $ z4.--.z1.--.z2.--.z6.- tension 1.5 -.cyclePath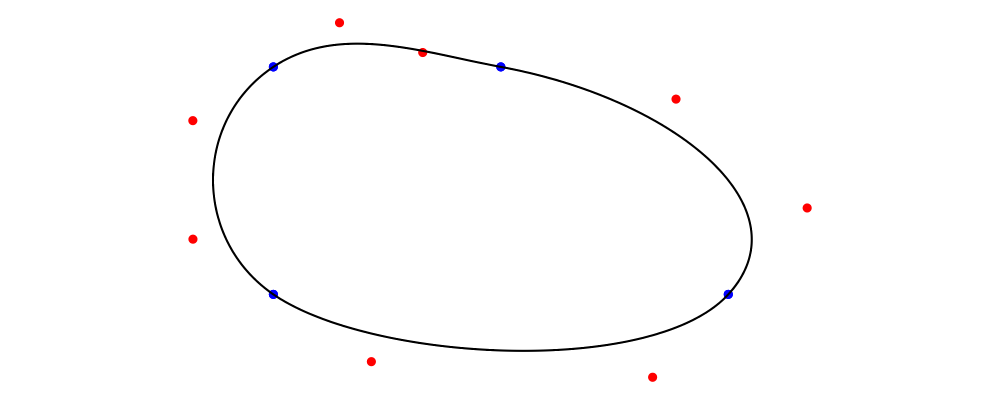
String Parsing
If you want to use paths already written for Metafont / Metapost, or want to stay even closer to that syntax, there is a parser available which implements the Metafont path syntax directly. At the expense of compile-time validity checking, and Haskell variables for points and directions, you can use the terser syntax created for Metafont.

> {-# LANGUAGE OverloadedStrings #-}
> import qualified Diagrams.TwoD.Path.Metafont as MF
> import Control.Lens as L
> example = L.view _Right $ MF.fromString "(1,0)..(0,0)..(0,1)..tension 1.2..(2,1)..(2,0)..cycle"
Quasiquoting
Add dequoting to the parser, so we can interpolate Haskell variables into Metafont syntax.
Further Reading
Here is the code that marks the control points in examples above:
> -- Type signatures may be needed to resolve ambiguity
> --ptMark :: Diagram SVG V2 Double
> ptMark = circle 0.02 # lwG 0
>
> --illustrateSegment :: FixedSegment V2 Double -> Diagram SVG V2 Double
> illustrateSegment (FLinear from to) = position [
>   (from, ptMark # fc blue),
>   (to,   ptMark # fc blue)]
> illustrateSegment (FCubic from c1 c2 to) = position [
>   (c1, ptMark # fc red),
>   (c2, ptMark # fc red)] <> illustrateSegment (FLinear from to)
>
> --illustrateTrail :: Renderable (Path V2 Double) b => Trail V2 Double -> Diagram b V2 Double
> illustrateTrail t = strokeTrail t <> (mconcat . map illustrateSegment . fixTrail . flip at origin $ t)
The authoritative references on Metafont are of course the following books by Knuth:
Donald Knuth. Metafont: The Program, Addison-Wesley 1986. ISBN 0-201-13438-1
Donald Knuth. The Metafontbook, Addison-Wesley 1986. ISBN 0-201-13444-6. The source code of the book in TeX is available online on CTAN.
Donald Knuth. The Metafont source code is written in the WEB programming language, and includes very extensive documentation about the algorithms used in Metafont.
If your paths do not render the same way in Diagrams that they do in Metafont or Metapost, please file a bug.